10 Innovative No Waste Garden Ideas for Sustainable Growing
Recommended Products

43 Gal Dual Chamber Composter: This 43 gallons composter with dimensions of 27.6 × 25.8 × 36 inch. This large tumbling composter makes recycling kitchen scraps a breeze.

PRE-EMBEDDED NUTS FOR SOLO ASSEMBLY: Rethought for hassle-free backyard setups. This outdoor compost tumbler integrates heavy-duty metal nuts directly molded into the weatherproof resin panels. Simply align the structured panels and drive screws straight into the iron support frame, eliminating loose washers and allowing smooth solo assembly.

Fast, Effortless Composting: This outdoor compost bin features a 360° rotating design with built-in mixing bars—just spin the drum for thorough mixing, no manual turning needed. Adjustable air vents let you control airflow, moisture, and temperature to reduce odors and accelerate decomposition, making this compost bin both efficient and low-maintenance.
1. Create a DIY Compost Tumbler
Transform an old plastic barrel into a compost tumbler by drilling ventilation holes and mounting it on a stable frame. This efficient system allows you to easily turn kitchen scraps, yard waste, and paper products into nutrient-rich soil amendments. Simply rotate the barrel a few times each week to aerate the materials and speed up decomposition.
2. Build Raised Beds from Reclaimed Wood
Repurpose old wooden pallets, fence boards, or furniture to construct durable raised garden beds. These elevated growing spaces improve drainage, reduce back strain, and make efficient use of materials that might otherwise end up in landfills. Treat untreated wood with natural linseed oil to extend its lifespan without introducing harmful chemicals to your garden.
3. Make Newspaper Seed Pots
Create biodegradable seed-starting containers using old newspaper. Simply wrap newspaper strips around a small cylindrical object like a spice jar, fold the bottom, and fill with seed-starting mix. When seedlings are ready for transplanting, place the entire pot in the soil where the newspaper will break down naturally, eliminating transplant shock.
4. Install a Rainwater Collection System
Capture rainwater from your roof using gutters connected to rain barrels or cisterns. This free water source reduces your utility bills while providing plants with chlorine-free water. Connect multiple barrels with overflow hoses to maximize collection capacity during heavy rainfall, and install a spigot near the bottom for easy access.
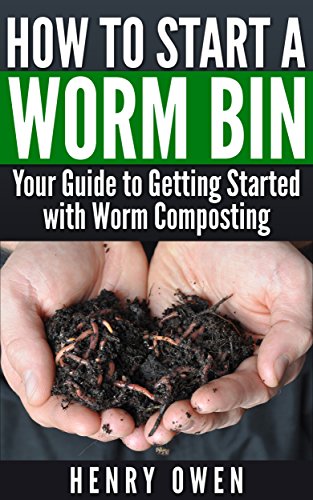
5. Design a Worm Bin for Vermicomposting
Convert a plastic storage container into a worm composting system by drilling air holes in the lid and sides. Add shredded newspaper, red wiggler worms, and kitchen scraps to produce worm castings—a potent organic fertilizer rich in beneficial microbes. Harvest the castings every few months to supercharge your garden soil with natural nutrients.
6. Grow Plants in Repurposed Containers
Turn old bathtubs, sinks, wheelbarrows, boots, and tin cans into unique planters. Ensure proper drainage by drilling holes in the bottom of containers that don’t already have them. Different containers work best for exact plants—deep ones for root vegetables, shallow ones for herbs, and hanging options for trailing flowers or strawberries.
7. Create Trellises from Salvaged Materials
Fashion climbing supports from discarded items like bed frames, bicycle wheels, ladders, or branches. These vertical growing structures maximize garden space while keeping vining plants like cucumbers, beans, and peas off the ground. Secure them properly to prevent toppling in strong winds and position them where they won’t shade sun-loving plants.
8. Practice Sheet Mulching with Cardboard
Layer flattened cardboard boxes around plants to suppress weeds, retain moisture, and gradually add organic matter to your soil. Cover the cardboard with compost, leaves, or grass clippings to improve appearance and speed decomposition. This no-dig method improves soil health while repurposing packaging materials that would otherwise be discarded.
9. Make Homemade Plant Markers
Create durable plant markers from wine corks, plastic cutlery, painted rocks, or broken pottery pieces. Write plant names with permanent markers or weather-resistant paint to create long-lasting labels that help you track what’s growing where. This simple project keeps materials out of landfills while adding functional decoration to your garden beds.
10. Establish a Garden Tool Library
Set up a neighborhood tool-sharing system where participants can borrow specialized equipment like tillers, pruners, or wheelbarrows. This cooperative approach reduces the need for everyone to purchase and store duplicate tools. Create a simple checkout system using a shared spreadsheet and designate a secure location for tool storage and pickup.
Starting a Compost Bin: The Foundation of a No Waste Garden

Creating your own compost bin is the cornerstone of any successful no-waste garden. It’s the perfect way to transform kitchen scraps and yard waste into nutrient-rich soil while significantly reducing landfill contributions.
Recommended Products

DEEP PLANTER FOR MAXIMUM YIELD: With 16" of soil depth and a spacious planting area, this elevated bed supports healthy root vegetables like carrots, beets, and radishes while allowing more crops per bed, boosting overall harvest and garden productivity

LARGE PLANTING SPACE: 8.4 cubic feet of space can support your choice of flowers, succulents, vegetables, and more
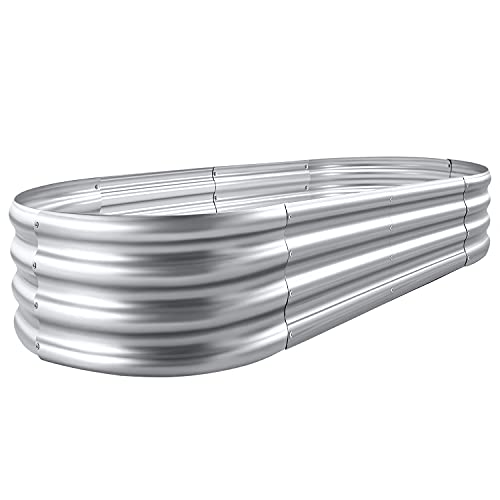
Each raised metal garden bed size: 4×2×1ft ,7.14Cu
DIY Compost Bin Designs
You’ll find many budget-friendly compost bin options that require minimal tools and expertise. Convert an old wooden pallet into a simple compost frame by securing three or four pallets together with heavy-duty zip ties or screws. For apartment gardeners, try a compact tumbler system made from a repurposed plastic barrel mounted on a wooden frame that allows for easy turning. Wire mesh bins offer excellent airflow and can be crafted by forming hardware cloth into a cylinder secured with wire or zip ties. For those with more space, the three-bin system—consisting of separate areas for fresh materials, active composting, and finished compost—maximizes efficiency. Even a simple pile contained by cinder blocks or bricks works effectively if you turn it regularly. Whatever design you choose, ensure it provides adequate ventilation, retains some moisture, and allows for easy turning.
What to Compost and What to Avoid
You’ll accelerate your composting process by balancing “green” nitrogen-rich materials with “brown” carbon-rich materials in roughly equal proportions. Compost-friendly green materials include fruit and vegetable scraps, coffee grounds, fresh grass clippings, and plant trimmings. Effective brown materials consist of dry leaves, small twigs, shredded newspaper, cardboard, and sawdust from untreated wood. Turn your pile weekly using a garden fork to incorporate oxygen, maintain moisture similar to a wrung-out sponge, and expect finished compost in 2-6 months depending on conditions. Avoid adding meat, dairy, oils, diseased plants, pet waste, treated wood, glossy paper, and weeds gone to seed as these can attract pests, introduce pathogens, or contaminate your finished compost. For faster decomposition, chop larger materials into smaller pieces before adding them to your bin, providing more surface area for beneficial microorganisms to work their magic.
Repurposing Household Items as Unique Planters

Transform your garden into an eco-friendly oasis by giving everyday household items a second life as creative planters. This approach not only reduces waste but also adds character to your garden space with unique containers that showcase your personality.
Recommended Products

Make Your Own Biodegradable Seed Starter Pots: Create eco-friendly paper pots using newspaper or scrap paper, ideal for starting seeds indoors and reducing plastic waste

Indoor Garden Seed Starter Trays: Kickstart your indoor garden effortlessly with our thoughtfully designed seedling start trays. Each cell measures 1.6 inches in width, 1.6 inches in length, and 2 inches in depth, offering the perfect size for a wide array of seeds, including herbs, microgreens, succulents, tomatoes, roses, vegetables, and more.

【Package Included】 The package include 60Pcs 3.1" Biodegradable Peat Pots and 60Pcs Plant Labels.
Kitchen Containers That Make Perfect Pots
Your kitchen is a treasure trove of potential planters waiting to be discovered. Old colanders make excellent herb planters with built-in drainage—simply line with coconut coir to prevent soil from escaping. Chipped teacups and coffee mugs serve as charming homes for succulents or small flowering plants, adding whimsy to windowsills or outdoor tables. Consider repurposing unused food cans by removing labels, punching drainage holes, and decorating with weather-resistant paint for colorful container gardens. Even that forgotten rice cooker with a broken heating element can become a stylish planter for shallow-rooted plants after proper cleaning and drainage modification. Mason jars work wonderfully for water-loving plants or as mini terrariums for moisture-loving specimens like ferns and moss.
Upcycling Furniture into Garden Features
Breathe new life into worn-out furniture by converting it into stunning garden features. Transform an old dresser by removing drawers at various depths to create a tiered planting display—apply weather-resistant sealant to protect wood from moisture. Broken chairs can become whimsical planters when you remove the seat and secure a planter basket in its place. Repurpose a vintage metal bedframe as a trellis for climbing plants like morning glories or clematis. Metal filing cabinets, once cleaned and painted with rust-resistant paint, make surprisingly durable raised beds with built-in compartments for different crops. Even that cracked bathtub or sink from your bathroom renovation can become a statement container garden after adding drainage holes—perfect for growing deep-rooted vegetables or creating a miniature water garden with aquatic plants.
Creating Natural Pest Control Solutions from Kitchen Scraps

Your kitchen scraps aren’t just compost material—they’re powerful allies in natural pest management. By repurposing common food waste, you can create effective pest control answers that protect your plants without harmful chemicals.
Recommended Products

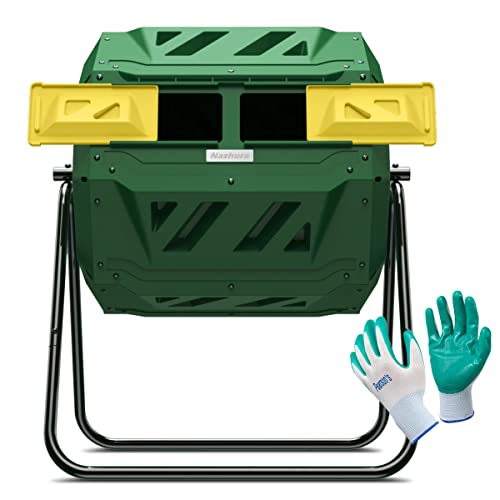
✅Speed Up Composing Process: More advanced models use rotating to bring oxygen to the center of the bin and paddles inside the chamber to help mix and aerate the composting materials when turned. These improvements or modifications are designed for one reason: to speed the composting process.

2 × 22.5 Gallon Chambers for Continuous Composting: This outdoor compost bin features two independent chambers (45 gallons total), allowing you to fill one side with fresh waste while the other side breaks down—ensuring a continuous supply of nutrient-rich compost. A smarter outdoor compost tumbler design for faster, more efficient results.
Citrus Peel Sprays and Eggshell Barriers
Transform leftover citrus peels into potent pest deterrents by creating homemade sprays. Soak orange, lemon, or grapefruit peels in water for 24 hours, then strain and add a drop of dish soap to create a spray that repels aphids, ants, and whiteflies. The natural oils in citrus peels contain d-limonene, which disrupts insects’ nervous systems while being harmless to beneficial garden creatures. For slugs and snails, crush dried eggshells and create protective barriers around vulnerable plants. The sharp edges deter these soft-bodied pests, while the calcium-rich shells gradually enrich your soil. Apply these barriers in a 2-inch wide ring around plant bases after each rain to maintain their effectiveness.
Coffee Ground Pest Deterrents
Used coffee grounds work double-duty in your no-waste garden as both fertilizer and pest control. Sprinkle them around plant bases to repel slugs, snails, cats, and even destructive ants. The grounds’ abrasive texture and caffeine content naturally deter these unwanted visitors without harming your plants. For maximum effectiveness, apply a half-inch layer of dried coffee grounds in a ring around plants or along garden borders. Coffee grounds also attract earthworms while deterring mosquitoes and fruit flies, making them particularly valuable near outdoor seating areas. Reapply after heavy rain to maintain their repellent properties throughout the growing season.
Saving and Storing Seeds from Your Garden Harvests

Collecting and storing seeds from your garden creates a truly sustainable growing cycle that eliminates waste and saves money. By harvesting your own seeds, you’ll preserve successful plant varieties adapted to your exact growing conditions while reducing packaging waste from commercial seed purchases.
Recommended Products

Multifunctional Design: This garden planter is separated into two growing areas for different plants or planting methods. The baffle can be removed to form a bigger growing area.


Spacious Planting Area: This raised bed features an extended 8.4 Cu. Ft. planting space, giving plants plenty of room to spread roots, absorb nutrients, and thrive throughout the growing season
Best Practices for Seed Collection
Timing is everything when collecting seeds from your garden. Wait until seeds are fully mature—usually when seed pods turn brown and begin to crack open naturally. For vegetables like tomatoes and cucumbers, harvest seeds when the fruits are slightly overripe. Extract wet seeds (like those from tomatoes and squash) by scooping them out, rinsing away the pulp, and allowing them to dry completely on paper towels for 1-2 weeks. For dry seeds like beans and sunflowers, allow the pods to dry on the plant before collecting. Always choose seeds from your healthiest, most productive plants to preserve desirable traits. Label each seed collection immediately with the plant name, variety, and harvest date to prevent confusion later.
Creating a Seed Library System
Establish an organized seed storage system using recycled containers like small glass jars, paper envelopes made from old magazines, or repurposed pill bottles. Add silica gel packets from packaged products to absorb excess moisture and extend seed viability. Store your seed collection in a cool, dark, and dry location—ideally between 32-41°F with less than 10% humidity. Categorize seeds by plant families or growing seasons, and create a simple inventory spreadsheet to track germination rates and planting schedules. Consider partnering with neighbors to start a community seed exchange, where everyone brings saved seeds to share, multiplying your variety options without any additional cost or waste. Your seed library will become more valuable each year as you select and save varieties particularly suited to your microclimate.
Growing New Plants from Kitchen Scraps and Cuttings

Transform your kitchen waste into thriving plants by regrowing food scraps and taking cuttings from existing plants. This practice eliminates waste while providing you with free plants and fresh produce.
Recommended Products

Collect and Recycle Rainwater. Designed for 3"x4" oversize downspout, which also accommodates 2"x3" standard downspouts. This rainwater diverter effectively directs rainwater from a downspout into a rain barrel, making it a great choice for your garden
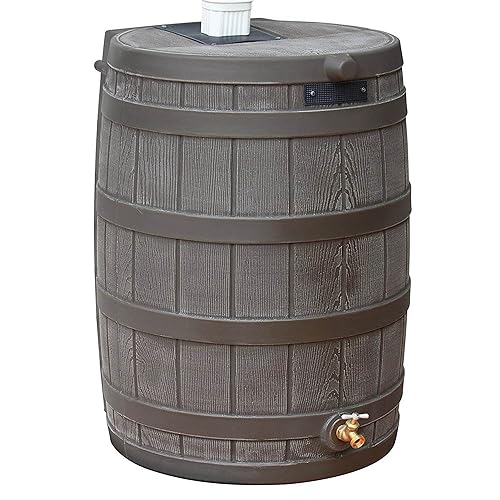
Ensure a backup water supply for your home using the faux wood rain barrels to collect rainwater from the gutter, made of durable plastic that resists weather and UV damage

【Designed to Keep Debris Out and Water Flowing】Our rainwater harvesting system features a built-in filter that traps leaves, twigs, and debris. The removable filter panel lets you easily inspect and clear out buildup anytime—so clogs never stand a chance.
Vegetables That Regrow from Scraps
Many vegetables can be regrown from their leftover parts, saving you money while reducing waste. Green onions are among the easiest—simply place the white roots in water, and you’ll see new growth within days. Celery bases will sprout new stalks when placed in shallow water and then transferred to soil. Lettuce and cabbage cores can be placed in water to grow new leaves. Potato eyes, ginger rhizomes, and garlic cloves will all sprout when planted in soil. Even carrot tops will produce lush greens (though not new carrots) when placed in water. For a continuous harvest, try regrowing bok choy, leeks, and fennel by placing their bases in water until roots form, then planting them in soil.
Propagation Techniques for Herbs and Ornamentals
Multiply your herb garden and ornamental plants through simple propagation methods. For herbs like basil, mint, and rosemary, clip 4-6 inch stems just below a leaf node, remove lower leaves, and place in water until roots develop before planting. Succulents propagate easily from single leaves placed on top of soil—no water needed until roots appear. Root division works well for expanding your collection of perennial herbs like oregano and thyme—simply dig up the plant, gently separate the root ball, and replant the divisions. For houseplants, try air layering by wrapping a small cut on a stem with damp sphagnum moss and plastic wrap until roots form, then cutting below the roots and potting up your new plant. Even pineapple tops can be rooted by removing the fruit flesh, letting the top dry for a few days, and placing it in water or soil until it roots.
Building Soil Health with Homemade Amendments

Building rich, fertile soil is essential for a thriving no-waste garden. By creating your own soil amendments from household waste, you’ll save money while giving your plants exactly what they need to flourish.
Recommended Products

EASY SEED STARTING: Place your 3 inch peat pots for seedlings on a tray, fill with seed starting mix, water until saturated, and sow seeds as directed for healthy germination.

The ideal Seed Starting Starter Kit: The Doubleggs plant starter pots package includes 70 plant germination pots, 100 premium planting labels, and 2 mini plant transplanting tools, offering incredible value.

【Package Included】 The seed starter pots includes 45pcs 3.15 inch biodegradable peat pots and 30 pcs plant labels. The perfect peat pots for seedlings of vegetables, fruits, flowers, herbs, etc. Compatible with most 1020 trays.
Tea and Coffee Ground Fertilizers
Coffee grounds offer an excellent nitrogen boost for your garden soil. Simply collect used grounds and sprinkle them directly around acid-loving plants like blueberries, azaleas, and hydrangeas. For a quick-release fertilizer, mix 1 cup of used coffee grounds with 3 gallons of water and let it steep overnight. Used tea bags and loose tea leaves work similarly, providing trace minerals and tannic acid that benefit plant growth. They’re particularly effective for roses, ferns, and many vegetables. For best results, tear open used tea bags and incorporate the damp leaves into your soil or compost pile. These caffeine remnants also help repel certain pests like slugs and cats while improving soil drainage and microbial activity.
Eggshell and Banana Peel Nutrient Boosters
Eggshells provide essential calcium that prevents blossom end rot in tomatoes and strengthens plant cell walls. Rinse, dry, and crush them into a fine powder before mixing into your soil. For maximum absorption, soak crushed eggshells in vinegar for 2-3 days, then dilute the mixture with water at a 1:1 ratio before application. Banana peels deliver potassium, phosphorus, and magnesium—nutrients crucial for flower and fruit development. You can bury chopped peels directly in the soil around plants or create a “banana tea” by soaking peels in water for 48 hours. These homemade amendments work gradually, releasing nutrients as they decompose and promoting long-term soil health without the harsh chemicals found in commercial fertilizers.
Implementing Water Conservation Systems

Water conservation is a cornerstone of no-waste gardening that helps reduce environmental impact while cutting down on utility bills. By capturing and reusing water that would otherwise go to waste, you’ll create a more sustainable garden network that thrives even during dry periods.
Recommended Products


50-Gallon Capacity: Provides ample storage for harvested rainwater, ideal for watering gardens, lawns, and plants.

Enhanced Filtering System:Say goodbye to clogged rainwater collection systems! Our system is equipped with a removable filter window and filter net, allowing for easy cleaning of debris and residue, ensuring crystal-clear rainwater collection.
DIY Rain Barrels and Collection Methods
Rain barrels are one of the simplest yet most effective water conservation systems you can carry out in your garden. Start by repurposing a food-grade 55-gallon plastic drum or trash can into a collection vessel. Install a spigot near the bottom for easy access to the water, and create an overflow outlet to prevent flooding during heavy rainfall. Position your rain barrel beneath a downspout, using a downspout diverter to channel water directly into the barrel. For maximum efficiency, elevate your rain barrel on cinder blocks or a sturdy stand to increase water pressure and make filling watering cans easier. Multiple barrels can be linked together with connector hoses to increase your collection capacity, allowing you to harvest thousands of gallons of free water annually. During winter months in colder climates, remember to disconnect and drain your system to prevent freeze damage.
Greywater Recycling for Garden Irrigation
Transform your household water waste into a valuable garden resource by implementing a greywater recycling system. Greywater—the relatively clean wastewater from bathroom sinks, showers, and washing machines—can safely irrigate ornamental plants and fruit trees when properly managed. Install a simple diversion system using PVC pipes to redirect washing machine discharge water directly to garden beds, or use a branched drain system that distributes water to multiple locations. When using greywater, switch to plant-friendly, biodegradable soaps free from boron, bleach, and sodium compounds. Create mulch basins around plants to filter the water and prevent runoff, ensuring greywater is applied directly to soil rather than plant foliage. For optimal plant health, alternate between greywater and freshwater irrigation, and avoid using greywater on root vegetables or leafy greens that will be consumed raw. This simple recycling approach can reduce your household water consumption by up to 30%, saving both resources and money.
Creating Garden Structures from Reclaimed Materials

Recommended Products

Compact, High-Efficiency Footprint Designed to maximize composting capacity while minimizing floor space.

Convenient Inground Worm Composter: Bury this vermicomposting bin underground or in your garden bed. Fill it with organic waste like kitchen scraps, paper, and leaves. In 2-3 months, worms transform it into nitrogen-rich compost. Perfect for eco-conscious families!

Compact, High-Efficiency Footprint Designed to maximize composting capacity while minimizing floor space.
Trellises and Supports from Tree Prunings
Transform your seasonal tree prunings into functional garden structures instead of sending them to the landfill. Collect sturdy branches from your pruning sessions and let them dry completely before using them as natural trellises for climbing plants like peas, beans, and cucumbers. Create teepee structures by binding 3-4 branches together at the top with garden twine or wire, forming the perfect support for vining vegetables. For more permanent answers, weave flexible willow or hazel branches into decorative lattice panels that offer both functionality and rustic charm. Fruit tree prunings can be repurposed as stakes for tomatoes or dahlias, while thicker branches work well as borders for raised beds. These natural supports blend seamlessly with your garden aesthetic while giving new purpose to what would otherwise be yard waste.
Pathways Using Broken Concrete or Reclaimed Brick
Turn demolition debris into charming garden pathways that add structure and reduce mud. Broken concrete pieces—often called “urbanite”—make excellent stepping stones when arranged with their flat sides up, creating stable walking surfaces that allow water to drain between the cracks. Collect discarded bricks from renovation projects or local construction sites (always ask permission first) and arrange them in herringbone or basketweave patterns for more formal paths. For an integrated look, plant low-growing groundcovers like creeping thyme or Roman chamomile between the stones, which release pleasant aromas when stepped upon. Edge your pathways with wine bottles turned upside down and buried halfway in the soil for an unexpected decorative touch. These hardscape elements not only divert materials from landfills but also create permeable surfaces that allow rainwater to return to the soil rather than contributing to runoff.
Embracing Companion Planting to Maximize Space and Reduce Waste

Companion planting is a strategic approach that maximizes garden space while naturally reducing waste and pest problems. By thoughtfully pairing plants that benefit each other, you’ll create a more efficient, productive garden network that requires fewer inputs and generates less waste.
Beneficial Plant Combinations
Companion planting relies on exact plant partnerships that enhance growth and deter pests naturally. Plant aromatic herbs like basil near tomatoes to improve their flavor and repel tomato hornworms. Marigolds make excellent companions throughout your garden, as their roots release compounds that deter nematodes and other soil pests. Interplant nitrogen-fixing legumes (beans, peas) with heavy feeders like corn or cabbage to naturally fertilize the soil. The classic “Three Sisters” method—combining corn, beans, and squash—exemplifies efficient space usage, with corn providing support for climbing beans, beans fixing nitrogen, and squash leaves shading the soil to prevent weeds and water loss. Nasturtiums attract aphids away from your vegetables while chives and garlic planted near roses help prevent black spot and repel destructive insects.
Succession Planting Strategies
Succession planting maximizes your harvest timeline and ensures no garden space sits empty. Start by mapping your garden to identify quick-growing crops (radishes, lettuce, spinach) that can be planted before or after longer-season vegetables. When early crops like peas finish in early summer, immediately replace them with heat-loving plants such as beans or summer squash. Create a detailed planting calendar tracking days to maturity for each crop, allowing you to precisely time new plantings as space becomes available. Interplant fast-growing crops between slower-developing vegetables—radishes mature quickly between carrot rows before the carrots need full space. Extend your growing season by using cold frames or row covers for early spring and late fall plantings, ensuring continuous production from the same space. This strategic approach keeps your garden productive year-round while minimizing bare soil that would otherwise need mulch or develop weeds.
How to Establish a Continuous Harvest No Waste Garden System
Your journey toward a zero-waste garden doesn’t require expensive equipment or special expertise—just creativity and commitment to sustainability. By implementing these eco-friendly practices you’ll create a thriving garden network that works with nature rather than against it.
Start small by repurposing household items and kitchen scraps before expanding to more advanced systems like rainwater collection or community seed exchanges. Each step reduces your environmental footprint while saving money.
The beauty of no-waste gardening lies in its cyclical nature—kitchen scraps become compost that nourishes plants that provide food and seeds for next season. This self-sustaining approach transforms your garden from a resource consumer into a resource creator.
Remember that your garden can be both beautiful and functional while remaining true to sustainable principles. Your actions today plant seeds for a greener tomorrow.
Recommended Products

Converting organic waste into nutrient-rich garden materials has created a year-round outdoor fine composting system, optimizing horticultural practices and promoting environmental protection

Better air-flow control and high compost efficiency