10 Smart Ways to Collect Rainwater for Sustainable Living
- Install Rain Barrels Under Downspouts – Rain barrels are the simplest way to start collecting rainwater. Place these containers directly under your downspouts to capture water flowing from your roof. A standard 55-gallon barrel can fill up during just one moderate rainfall, providing enough water for several garden watering sessions.
- Set Up a Rain Chain System – Replace traditional downspouts with decorative rain chains that guide water directly into collection containers. These attractive alternatives not only collect rainwater efficiently but also add an aesthetic element to your home’s exterior while creating a pleasant tinkling sound during rainfall.
- Create a Rain Garden – Design a shallow depression in your yard filled with native plants that can temporarily hold and soak up rainwater runoff. Rain gardens reduce water pollution by filtering runoff and allowing it to slowly absorb into the ground rather than flowing into storm drains.
- Build a Dry Creek Bed – Construct a shallow, rock-lined trench that directs rainwater to areas where it can be collected or absorbed. This method prevents erosion while channeling water to gardens, trees, or collection points throughout your property.
- Install Underground Cisterns – For larger-scale collection, underground cisterns can store hundreds or thousands of gallons of rainwater. These systems keep water cool and protected from algae growth while freeing up valuable yard space above ground.
- Use Rain Saucers – These funnel-shaped collectors can be placed anywhere in your yard to capture rainfall without needing a roof or gutters. They’re perfect for properties without traditional roofing systems or for supplementing existing collection methods.
- Create Rooftop Gardens – Green roofs not only insulate your home but also absorb rainfall and filter it before directing excess water to collection systems. The plants use some of the water while allowing cleaner runoff to be harvested.
- Carry out Permeable Surfaces – Replace concrete driveways and patios with permeable materials like gravel, pervious concrete, or interlocking pavers. These surfaces allow rainwater to seep through to collection systems underneath rather than running off into storm drains.
- Install Rain Pillows – These flexible containers can be placed under decks or in crawl spaces to collect and store rainwater in areas with limited space. When empty, they can be folded and stored, making them ideal for seasonal use.
- Set Up Multiple-Barrel Systems – Connect several rain barrels with overflow hoses to create a scalable collection system. This method allows you to expand your storage capacity over time and distribute collected water to different areas of your property as needed.
Recommended Products

Sturdy and Durable: Provides a strong, weather-resistant foundation to support your 55-gallon rain barrel for long-lasting use. **Note: Only compatible with the 55 Gallon Premium Flat Back Rain Barrel with Removable Lid from RTS Home Accents. NOT compatible with the 50 Gallon Flat Back Rain Barrel from RTS Home Accents or rain barrels from other manufacturers.

Maximizing Rain Storage Capacity: By using this hose, you can connect two or more rain barrels, maximizing rainwater storage capacity. This allows rainwater to be used for daily garden watering or outdoor cleaning, reducing your water bill (Not for metal barrels)

YOU NEED TO HAVE THE ACCESS TO THE INSIDE OF CONTAINER TO INSTALL THE NUT.
Installing Rain Barrels: The Classic Solution

Rain barrels remain the most popular and accessible method for harvesting rainwater. These containers connect directly to your downspouts, capturing water that would otherwise flow away from your property.
Recommended Products

SHOP WITH CONFIDENCE - Enhance your rainwater management with this U-nitt rain chain anchoring basin, designed for an open system that not only secures your rainchain while collecting rainwater from the roof, but also creates an instant fountain display that transforms your rainy day experience. A stylish alternative in place of a rain barrel, which conceals rain water. Built for stability and beauty, it's the perfect way to complete your rain chain setup!

Collect and Recycle Rainwater. Designed for 3"x4" oversize downspout, which also accommodates 2"x3" standard downspouts. This rainwater diverter effectively directs rainwater from a downspout into a rain barrel, making it a great choice for your garden

【Designed to Keep Debris Out and Water Flowing】Our rainwater harvesting system features a built-in filter that traps leaves, twigs, and debris. The removable filter panel lets you easily inspect and clear out buildup anytime—so clogs never stand a chance.
Choosing the Right Size and Material
Select a rain barrel that matches your collection needs and space constraints. For average households, 50-60 gallon barrels work well for most gardens, while larger 80-100 gallon models provide extended watering capacity during dry spells. Material choices impact durability and cost: recycled food-grade plastic barrels ($50-$100) offer affordability and lightweight handling; wooden barrels ($120-$300) provide aesthetic appeal but require more maintenance; and metal barrels ($150-$250) deliver industrial strength but may rust over time. Always check for FDA-approved food-grade materials, especially if you’ll use the water for edible plants or gardens.
Proper Placement for Maximum Collection
Position your rain barrel on level, stable ground beneath downspouts that drain the largest roof areas. Elevate barrels 12-24 inches on cinder blocks or a sturdy stand to increase water pressure and make bucket-filling easier. South-facing locations typically collect more rainfall in most regions, while placement near gardens reduces the distance you’ll need to transport water. For multi-story homes, consider installing barrels at both primary and secondary downspouts to maximize collection from all roof surfaces. Remember to leave enough clearance for accessing the spigot and connecting overflow hoses to direct excess water away from your foundation.
Setting Up a Rain Chain System

Rain chains offer an elegant alternative to traditional downspouts, guiding rainwater from your gutters to collection points while adding visual appeal to your home’s exterior.
Recommended Products

PERFECT SET TO MATCH: Our 100 gallon tank accessories include 2 x 275 gallon liner bags with bottom spout, 1 x 163mm plastic t-cap filter cap, 1 x 45° IBC cap filter cap, 1 x double hole cap, 1 x red single hole cap, and 2 x 1/2 faucet kits. Plenty of quantity and style.

Outdoor rain collection water catchers crafted with large openings and a conveniently flat back, which not only enables effortless installation but also enhances their functionality and efficiency

EASY TO USE AND STORE: Our water tanks' flexible PVC material can be easily used and folded for storage, and the thick, sturdy material with well-made seams will last for years. Rodelna water bladder storage is rainproof, fireproof, abrasion-resistant, collapsible, lightweight, easy to load and unload for transportation, etc., practical! Temperature resistant up to -30~+70.
Decorative Options That Enhance Your Home’s Exterior
Rain chains come in many decorative styles that can complement your home’s architectural features. Copper chains develop a beautiful patina over time, making them a popular choice for craftsman and traditional homes. For contemporary spaces, consider stainless steel or aluminum designs with geometric cups or links. Japanese-inspired kusari-doi chains feature cups or bowls that create a mesmerizing waterfall effect during rainfall. You’ll also find themed options like flowers, animals, or abstract shapes that can reflect your personal style while serving a practical purpose. These decorative elements not only manage rainwater but also create pleasant tinkling sounds during light rain, adding a sensory dimension to your outdoor space.
Installation Tips for Optimal Water Flow
Installing a rain chain correctly ensures maximum water collection efficiency. First, remove your existing downspout and measure the opening to purchase a compatible rain chain attachment or gutter adapter. Position a collection vessel like a rain barrel or decorative pot beneath the chain, or create a splash block or small rain garden to prevent erosion. For areas with heavy rainfall, choose chains with cups rather than simple links to prevent water from splashing excessively. Install your rain chain with a slight tension and secure it at the bottom with stakes or weights to prevent swinging in strong winds. For year-round use in colder climates, consider detaching your rain chains during freezing temperatures to prevent ice damage to your gutters and the chain itself.
Building a DIY Rainwater Harvesting System

Creating your own rainwater harvesting system is both economical and environmentally friendly. With some basic materials and tools, you’ll be able to collect and store hundreds of gallons of free water for your home and garden needs.
Recommended Products

FITS COMMON DOWNSPOUTS: Designed as a downspout diverter for standard 2 x 3 in and 3 x 4 in residential downspouts, connecting roof runoff to your rainwater collection system

【Universal Fit & Flexible Installation for Downspouts】This downspout diverter is designed to accommodate both standard 2"x3" downspouts and oversize 3"x4" downspouts. It features a reversible spout, allowing for left or right placement to suit your needs. With a generous 4-foot long, 1-1/4" reinforced hose, it easily reaches your rain barrel, no matter where it is located

Collect and Recycle Rainwater. This downspout diverter is designed for 2"x3" standard downspouts. This rainwater diverter effectively directs rainwater from a downspout into a rain barrel, making it a great choice for your garden
Cost-Effective Materials to Consider
Start your DIY rainwater harvesting project with budget-friendly materials that deliver reliable performance. Food-grade plastic barrels cost $20-$50 and offer excellent durability without leaching chemicals. PVC pipes ($10-$15 per 10ft) provide flexible routing options for directing water flow. First flush diverters ($25-$40) are essential for diverting initial contaminated runoff. Mesh screens ($5-$15) prevent debris and mosquitoes from entering your system. Consider adding an inexpensive spigot kit ($8-$12) for easy water access and a rain gauge ($10-$20) to measure collection efficiency. For larger systems, IBC totes ($50-$150 used) offer 275-330 gallon capacity at a fraction of commercial tank prices. Look for recycled materials at plumbing supply stores, agricultural suppliers, and online marketplaces to further reduce costs.
Step-by-Step Construction Guide
Begin your rainwater system construction by selecting an ideal location near a downspout on level, stable ground. Prepare a solid base using concrete blocks or a gravel pad to support your filled barrel’s weight. Next, modify your barrel by drilling holes for the spigot (near the bottom), overflow pipe (near the top), and inlet (on the lid). Install the spigot using plumber’s tape to ensure a watertight seal. Connect your downspout to the barrel using appropriate fittings or a downspout diverter kit. Add mesh screens to all openings to keep out debris and insects. For multi-barrel systems, connect containers using short PVC pipes installed near the top of each barrel, creating an overflow system. Test your setup by running water through the gutters and check for leaks or overflow issues. Finally, consider painting your barrels (using exterior latex paint) to prevent algae growth and extend their lifespan. Regular maintenance includes cleaning gutters, checking screens, and emptying the system before freezing temperatures arrive.
Creating a Rain Garden for Natural Collection

Rain gardens are shallow depressions designed to capture and absorb rainwater runoff from roofs, driveways, and other impervious surfaces. They’re both functional water collection systems and beautiful industry features that support local ecosystems.
Recommended Products

Water On Demand: Save water naturally for your lawn and garden using this faux wood rain barrel to collect rainwater from the gutter, made of durable plastic that resists weather and UV damage

RELIABLE LONG-LASTING VERTICAL WATER STORAGE: The Elkhart Plastics 1000 Gallon Water Container is designed for a wide range of applications; Vertical tanks are versatile for bulk water, well water storage, rainwater collection, and fire suppression
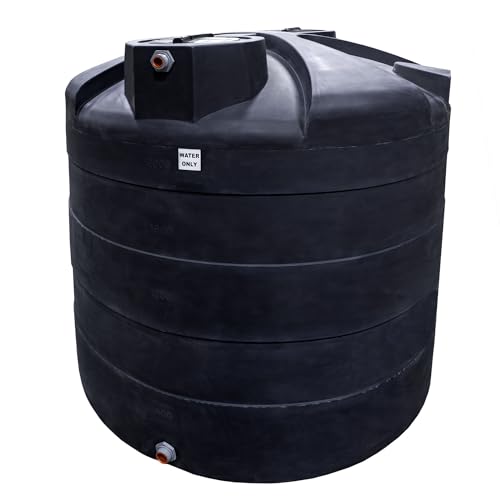
RELIABLE LONG-LASTING VERTICAL WATER STORAGE: The Elkhart Plastics 2500 Gallon Water Container is designed for a wide range of applications; Vertical tanks are versatile for bulk water, well water storage, rainwater collection, and fire suppression
Best Plants for Rain Gardens
Choose native plants with deep root systems for your rain garden to maximize water absorption and filtration. Switchgrass, blue flag iris, and joe-pye weed thrive in the periodically wet conditions at the garden’s center. For the middle zone, which experiences occasional standing water, plant black-eyed Susans, coneflowers, and cardinal flowers. In the outer edges that stay relatively dry, incorporate drought-tolerant options like butterfly weed, asters, and little bluestem grass. These native selections require minimal maintenance once established, attract beneficial pollinators, and efficiently process collected rainwater through their extensive root networks.
Design Principles for Effective Water Absorption
Position your rain garden at least 10 feet from your home’s foundation in a natural low point where water already flows. Size it appropriately—typically 20-30% of the area that drains into it—and excavate to a depth of 4-8 inches, creating a bowl-like depression with gently sloping sides. Layer the bottom with a mixture of compost, sand, and topsoil in a 1:1:1 ratio to enhance drainage while retaining moisture. Incorporate a shallow berm on the downhill side to temporarily hold water, allowing it to percolate within 24-48 hours. Add a river rock entrance where water enters the garden to prevent soil erosion and distribute water flow evenly throughout the planted areas.
Implementing Rooftop Collection Systems

Your roof is the perfect rainwater harvesting surface, offering extensive square footage to capture important volumes of precipitation. A well-designed rooftop collection system can dramatically increase your water harvesting capacity while integrating seamlessly with your home’s architecture.
Recommended Products

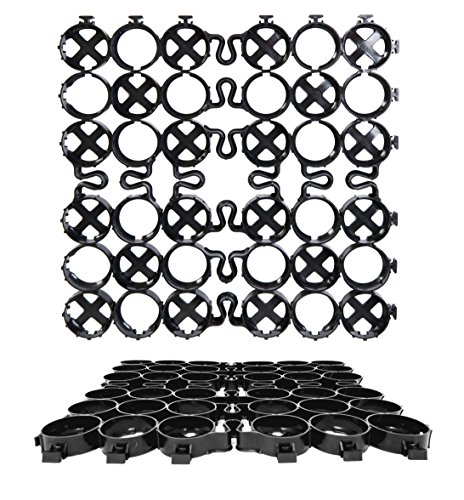
DURABLE AND ECO-FRIENDLY: Crafted from 100% recycled plastic, our gravel paver system delivers exceptional strength and longevity; This Permeable Paver System includes 14 units with a 2" depth, covering an area of 35 square feet

HEAVY-DUTY, DURABLE CONSTRUCTION : Our permeable pavers each piece measures 41 x 41 x 2.5 centimeters (16x16x1inch) and is made of thick, high-strength plastic mesh that can withstand vehicular traffic without deformation, ensuring the long-term durability of your permeable paving system

DURABLE AND ECO-FRIENDLY: Crafted from 100% recycled PPE plastic, our gravel paver system delivers exceptional strength and longevity; This set includes 330 units with a 1-inch depth, covering an area of 975 square feet
Professional vs. DIY Installation Options
When setting up a rooftop collection system, you’ll need to choose between professional installation or DIY approaches. Professional installations offer expertise and efficiency, with contractors handling complex aspects like structural assessments, proper sizing, and seamless gutter integration. Expect to pay $2,000-$6,000 for professional installation, depending on your roof size and system complexity. DIY installations, while more affordable at $500-$1,500, require technical knowledge and time investment. You’ll need to source materials like food-grade storage tanks, first-flush diverters, filters, and appropriate piping. Consider your budget, technical skills, and time constraints when making this decision. For complex systems or multi-story homes, professional installation provides peace of mind about safety and optimal performance.
Maintenance Requirements for Longevity
Maintaining your rooftop collection system ensures optimal performance and extends its lifespan. Clean gutters and downspouts quarterly to prevent debris buildup that can contaminate water and reduce flow. Inspect filters monthly during rainy seasons and replace them every 3-6 months depending on surrounding tree coverage and environmental conditions. Check storage tanks twice yearly for cracks, leaks, or algae growth, cleaning them with a mild vinegar solution when necessary. During winter in colder climates, disconnect and drain the system to prevent freezing damage. Install leaf guards on gutters to minimize maintenance needs and improve water quality. Regular inspection of roof surfaces, seals, and connections will help identify potential issues before they become important problems. With proper maintenance, your rooftop collection system can reliably operate for 15-20 years, providing sustainable water for various household and garden needs.
Using Smart Technology for Automated Collection

Smart technology has revolutionized rainwater harvesting by introducing automated systems that maximize efficiency while minimizing manual effort. These innovations allow you to collect more water with less work through intelligent monitoring and responsive collection mechanisms.
Recommended Products
EASY TO USE: Our lightweight permeable pavers are easy for any level of DIYer to install; Feel proud of your own outdoor home improvements!


DURABLE AND ECO-FRIENDLY: Crafted from 100% recycled PPE plastic, our gravel paver system delivers exceptional strength and longevity; This set includes 1440 units with a 2" depth, covering an area of 4900 square feet
Weather-Responsive Collection Systems
Weather-responsive collection systems represent the cutting edge of rainwater harvesting technology. These systems use weather forecasting data to automatically prepare for rainfall events, optimizing your collection capacity. Smart valves connect to your home’s WiFi and open or close based on real-time weather predictions, ensuring your barrels don’t overflow during heavy downpours and divert water appropriately. Some advanced systems like the RainGrid Smart Cistern can store up to 500 gallons while automatically managing water distribution based on your garden’s irrigation needs. These systems typically cost between $300-$1,200 depending on complexity but can increase collection efficiency by up to 40% compared to traditional methods.
Apps for Monitoring Your Rainwater Reserves
Mobile applications have transformed how you monitor and manage your rainwater collection system. Apps like RainHarvest and Water Manager connect to sensors in your collection tanks to provide real-time data on water levels, quality, and usage patterns. These platforms alert you when tanks are nearing capacity or when maintenance is required, helping prevent overflow and system damage. Many apps also integrate with smart home systems like Google Home or Amazon Alexa, allowing you to check water levels or activate distribution pumps using voice commands. Some sophisticated applications even provide analytics on your water savings and environmental impact, tracking how many gallons you’ve collected and how much you’ve reduced your municipal water consumption over time.
Constructing Underground Cisterns for Large-Scale Storage

Underground cisterns represent the pinnacle of rainwater harvesting technology, allowing you to store hundreds or even thousands of gallons beneath your property. These large-scale storage answers are ideal for homeowners seeking water independence or those in drought-prone regions who need substantial reserves.
Recommended Products

【 Well-designed 】 Full path, large flow, no limited flow trouble, this is a good choice. Heavy structural design, durable, beautiful and delicate appearance, 1/4 turn stainless steel large metal handle, easy to switch, long service life.

50-Gallon Capacity: Provides ample storage for harvested rainwater, ideal for watering gardens, lawns, and plants.

ALL AROUND PROTECTION: This lid cover can provide maximum weather and damage protection against harmful UV, rain, snow, dirt, and other elements.reduces evaporation .prolong the service life of your drum.
Benefits of Below-Ground Storage Answers
Underground cisterns offer important advantages over above-ground alternatives. You’ll conserve valuable yard space since the entire system remains hidden beneath the surface, maintaining your property’s aesthetic appeal. These systems provide natural insulation, protecting your water from freezing in winter and excessive heating in summer. A 1,500-gallon underground cistern can supply a family of four with water for nearly a month during dry periods. Also, below-ground systems are protected from UV damage, significantly extending their lifespan to 20-30 years compared to 5-10 years for most above-ground options. Many municipalities offer tax incentives for installing these environmentally-friendly systems, potentially saving you thousands in installation costs.
Safety Considerations for Installation
Installing an underground cistern requires careful planning and adherence to safety protocols. Always check local building codes and obtain necessary permits before breaking ground, as regulations vary significantly between jurisdictions. Hire professional excavation services equipped with proper machinery and safety gear for digging depths exceeding 4 feet. Conduct utility mapping to avoid damaging gas, water, or electrical lines during excavation. Select locations at least 50 feet from septic systems and ensure the cistern walls can withstand soil pressure by using reinforced concrete or specially designed plastic tanks rated for underground use. Install child-proof access points and locking mechanisms to prevent accidents, especially if you have children. Consider professional installation for complex systems that include pumps and filtration equipment to ensure proper functioning and reduce safety risks.
Incorporating Permeable Surfaces in Your Landscape

Permeable surfaces represent one of the most efficient passive rainwater collection methods, allowing precipitation to filter through your industry instead of running off. By replacing traditional impervious surfaces with permeable alternatives, you’ll create natural water reservoirs that replenish groundwater while reducing runoff and erosion.
Recommended Products

Enhance Your Home's Aesthetics: The rain chain is a beautiful and functional alternative to traditional gutter systems. It features 12 exquisite copper gird shape cups and a gorgeous acrylic pendant that will add a touch of elegance to your home.

【Beautiful Your House】The lotus rain chains is a beautiful and unique way to decorate your house, garden, patio, courtyard, villa, etc. These elegant rain chains not only add a unique decorative touch but also serve a functional purpose by guiding rainwater into a basin below.The gentle sound of flowing water creates a serene and calming atmosphere,perfect for relaxation
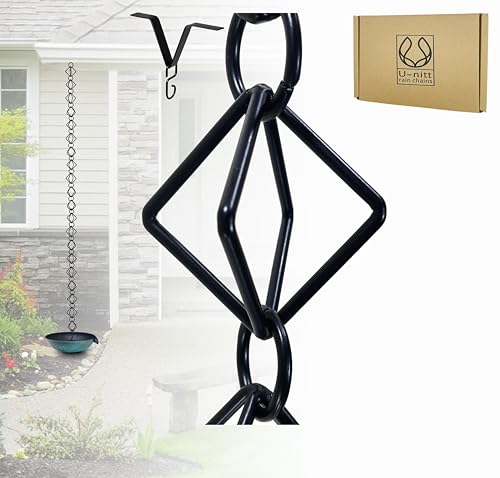
SHOP WITH CONFIDENCE - U-nitt premium rain water chain for gutter downspout is designed for durability and efficiency. Made with high-quality materials, it ensures long-lasting performance in all weather conditions. Each receptacle cup features a drainage to prevent overflow, while the cascading rain catcher chain collects rainwater efficiently. This complete rain chain kit, including a 8.5 ft chain, a gutter adapter clip and an an S hook. PLEASE NOTE THAT THE BOWL IN THE PHOTOS IS NOT INCLUDED.
Gravel Driveways and Pathways That Capture Rainwater
Gravel driveways and pathways offer an excellent permeable alternative to concrete or asphalt surfaces. These installations allow rainwater to percolate through the spaces between stones and into the soil below, effectively turning your entire driveway into a rainwater collection system. Install a 4-6 inch base of crushed stone beneath a 2-3 inch layer of decorative gravel for optimal drainage. Choose angular gravel that locks together rather than rounded pebbles for better stability and less displacement. For enhanced filtration capabilities, incorporate a geotextile fabric layer beneath the gravel to trap sediments while allowing water to pass through. Maintenance is minimal—simply rake occasionally to maintain an even surface and remove debris that might block water infiltration.
Permeable Pavers for Patios and Walkways
Permeable pavers combine functionality with aesthetic appeal, making them perfect for patios and walkways in your rainwater harvesting industry. These specialized pavers feature wider-than-normal joints filled with fine gravel or sand that allow water to filter through to a prepared base of crushed stone below. Modern permeable paver systems can absorb 3-5 inches of rainfall per hour, significantly reducing runoff during heavy storms. Choose from concrete, clay, or recycled plastic options in various shapes and colors to complement your home’s exterior. Installation requires creating a proper foundation with layers of differently sized aggregate to help drainage and filtration. Though initially more expensive than traditional pavers ($10-20 per square foot installed), permeable versions provide long-term benefits through improved drainage, reduced water pooling, and contribution to your overall rainwater management strategy.
Utilizing Rainwater for Indoor Purposes

Rainwater isn’t just for your garden—it can serve many purposes inside your home, reducing your utility bills and environmental footprint. With proper treatment and storage, harvested rainwater can become a valuable resource for various household activities.
Filtration Methods for Safe Indoor Use
Converting rainwater for indoor use requires thorough filtration to remove contaminants and ensure safety. Start with a first-flush diverter to eliminate initial roof runoff containing the highest concentration of pollutants. Install a multi-stage filtration system that includes sediment filters (20-5 microns) to remove larger particles, followed by activated carbon filters to address odors and some chemicals. For drinking water applications, consider UV sterilization systems which kill 99.99% of harmful microorganisms without chemicals. Reverse osmosis systems provide the highest level of purification but require more energy and create wastewater. Regular maintenance of these systems is essential—replace filters according to manufacturer recommendations, typically every 3-6 months depending on usage and water quality.
Legal Considerations for Indoor Rainwater Usage
Before implementing an indoor rainwater system, check your local regulations as they vary significantly by location. Many states have exact codes governing rainwater harvesting for indoor use, particularly for potable purposes. In some regions like Colorado and Utah, restrictions exist on collecting rainwater beyond garden use, while Texas and Ohio offer tax incentives for approved systems. Contact your local water authority or building department to obtain necessary permits—most jurisdictions require professional installation with backflow prevention devices to protect municipal water supplies. Health departments typically mandate regular water quality testing for systems supplying drinking water, with frequency ranging from quarterly to annually. Keep detailed records of your system’s design, installation, and maintenance to demonstrate compliance during inspections.
Maintaining Your Rainwater Collection System Year-Round
Harvesting rainwater isn’t just environmentally conscious—it’s a smart investment in your property’s sustainability. By implementing these collection methods you’re taking control of a valuable resource that falls freely from the sky.
Whether you’ve opted for simple rain barrels decorative rain chains or sophisticated underground cisterns regular maintenance will ensure your system functions efficiently for years to come. Remember to clean filters inspect components seasonally and protect your system during freezing temperatures.
The beauty of rainwater harvesting lies in its adaptability to your exact needs and property. Start small and expand as you become more comfortable with the process. Your garden will thank you your water bills will decrease and you’ll be contributing to water conservation efforts in your community.
Recommended Products

Upgraded Design Collects More Water, Even in Heavy Rain: Our rain barrel diverter features a deepened collection chamber that holds more water, ensuring maximum flow to your rain barrel. The enlarged top drain activates during downpours, draining excess water faster than standard designs. So you collect more rainwater and waste less.

50-Gallon Capacity: Provides ample storage for harvested rainwater, ideal for watering gardens, lawns, and plants.